Category Archives: Computers

You Win Some, You Lose Some

You Win Some, You Lose Some

by Richard White

2011-07-06

It was an interesting school year for me at my school site. As is usually the case for anyone working with technology in education, there were some accomplishments achieved that gave me a strong sense of satisfaction, and there were some disappointments that left me feeling frustrated or annoyed.

In the interest of trying to put everything in perspective, I thought it would be fun to go over some of the highlights. I believe there’s a lot of value in sharing these experiences, particularly as so many of us occasionally feel like we’re working alone in our efforts to improve the use of technology in education. Some of these events may resonate with you. Some of my frustrations may give you a new sense of hope about how much progress you’ve made at your own school. Some of my successes may only increase in your dismay at how glacially slow things seem to move sometimes.

Regardless, we’re all doing the best we can to push things along in the right direction. There are some wonderful things happening at my site that aren’t included here because they have more to do with infrastructure: our IT director increased bandwidth to the school this year, for example. Also, new construction at the Lower and Middle School has included the installation of Epson Brightlink interactive projectors in every new room.

Here’s a quick recap of what happened during my school year at the Upper School:

  • All K-12 teachers were required to have a webpage for each class they teach.
    Our head of school made the good decision to require all teachers to have an official school website-affiliated webpage. Specific requirements were developed by a committee I served on. Ed Tech staff did a good job offering workshops to help prepare less tech-savvy teachers with the transition. The committee also recommended that an appropriate administrator follow up with teachers who needed additional “encouragement” in keeping their pages up to spec, although that never happened, so implementation and use of webpages is not very consistent.
    IDEA: A
    IMPLEMENTATION: A
    FOLLOW-THROUGH: C
  • iPads purchased for classes next year
    A Social Sciences teacher and an English teacher, both technologically-experienced, proposed that a set of iPads would be useful for students in their elective courses. The iPads would store course documents, and be used in class and at home for reading those documents, and taking notes on them. The proposal evolved over the course of the year, and was approved by our Ed Tech committee and by the school’s Tech Director. We’re all looking forward to seeing how this pilot program works out.
    IDEA: A
    SUPPORT FROM SCHOOL: A
    IMPLEMENTATION: We have high hopes
  • Offsite Humor Website “busted”
    I was co-author of an unofficial website that lampooned the Upper School director (with his permission). The site was “busted” by other staff members, who went to that same director with their concerns. The creative “alternative social media” site went underground after that, and the whole affair left a bit of a sour taste in everyone’s mouth.
    IDEA: A
    IMPLEMENTATION: A
    MICROMANAGERIAL RESTRAINT: D
  • Lori Getz came to talk about online safety (Technology Night for parents)
    After years of advocating for a “Parents Technology Night” without any success, one of our school directors decided to invite Lori Getz to speak on the subject of Cyber Safety to our parents and teachers. Lori’s message was appropriate, especially for our Lower and Middle School parents, and I’m glad that someone chose to bring her to the school. The Education Technology Committee had absolutely nothing to do with that decision, however, leaving me to wonder how strong a role we play at the school.
    IDEA: A
    RESULT: A
    IMPLEMENTATION: C-
  • Technology Curriculum at the Upper School
    There are now two technology-related courses in our Upper School: a Social Media course and my Intro to Computer Science class. As measured by enrollment and reputation among students, both electives have been very successful, which I consider a minor miracle itself at our strongly traditional prep school. In the case of the programming class, the IT staff have provided support well beyond what many schools would offer.
    COURSE CURRICULUM: A
    IMPLEMENTATION: A
    RESULTS: A
  • Online Test Calendar trial scrapped
    For several years, the school has been searching for a way to coordinate and manage the tests that students take in their classes. A paper-based test calendar has worked well enough, and there was an attempt this past year to explore a means of putting that calendar online, permitting increased access by students, teachers, and parents. After several meetings and prototyping sessions, I and another teacher concluded that we don’t currently have a good solution to offer the school in this area, and the Upper School director supported us in that analysis.
    IDEA: A
    EXPLORATION PROCESS: A
    DECISION NOT TO IMPLEMENT A BAD SOLUTION: A
  • Student access to network increased
    After an increase in requests for student access to the Internet, the school’s IT department created a WiFi hotspot near the administration building, where students can use their own laptops on the Internet. Content is filtered, but social media sites such as Facebook are not blocked. In my opinion, it’s an important step along the way to providing something that students already have on their cellphones and iPads: full Internet access all the time.
    IDEA: A
    IMPLEMENTATION: B
    HOPE FOR THE FUTURE: A
  • Automated backups of teachers’ computers implemented
    After many years of discussion, our school has begun offering an automated backup plan (Crash Plan) for teachers’ computers.
    IDEA: A
    RESULT: A
    IMPLEMENTATION: C+ (for delay)
  • LearnAPphysics.com grew
    A personal project, this database-drive website provides free, daily practice problems (via email or Internet) to students and teachers who sign up. Subscriptions increased to 3500+ over the course of the year, meaning that I’m spending part of the summer investigating inexpensive email solutions that won’t result in the emails from the site being tagged as spam.
    IDEA: A
    FEEDBACK FROM USERS: A
    FUN IN MANAGING EMAIL: D
  • Request for Professional Growth Support denied
    With the proven success of the LearnAPphysics.com website, I decided this year to expand and that and develop a LearnConceptualPhysics.com website as well. My school is very generous in supporting a number of professional growth and curriculum development projects with funding: teachers submit an application, and may receive up to a maximum of $4000 for their project. My proposal was not funded for a number of reasons, including lack of money (other projects were deemed more deserving than mine) and concern about who would own the materials I’d be developing for the site.
    IDEA: A
    FINAL PRODUCT (I’ll be proceeding with the project, without school funding): A
    INSTITUTIONAL SUPPORT: C (This would have been an D, but the chair of the Professional Growth committee was very good about communicating with me.)
  • Evaluation of school’s educational technology will happen next year
    The school’s Educational Technology “Department” has been charged with doing a WASC-style self-study next year, despite the fact that no such department actually exists. To make things even more confusing, I (a chair of the Ed Tech committee, and the one usually tagged for chair duties), wasn’t informed that such a self-study would happen, at least not until after someone else had already been selected for the role of chair of the committee.
    IDEA: B
    IMPLEMENTATION: D
    ANTICIPATED RESULTS OF SELF-STUDY EVALUATION OF TECH AT UPPER SCHOOL: C+
  • Changing Upgrade Cycle from 4 years to 3 years
    Technology is moving at such a pace that power users using a 3.5-year old laptop are suffering. Our school has been generous in providing teachers with a new computer every four years, but it’s my contention that that’s far too long, especially for advanced users, who have resorted to buying their own computers in order to have the power that they need.
    IDEA: A
    REALISTIC PROBABILITY OF SUCCESS DURING ECONOMIC DOWNTURN: 0.1%

I hope these examples serve to illustrate how difficult it can be to make progress, even when teachers have good ideas and a school genuinely wants to proceed in the right direction. Lack of funding, fear of setting the wrong precedent, fear of botching an implementation, etc., are all logistical realities that we and our administrators have to struggle with.

Despite the challenges I faced, it seems to me that it was a pretty good year, all in all.

How do these experiences compare with your own, at your school site? What kinds of progress did you make this year? What frustrations did you experience?
Building Your Own PC, part 3 – Assembling the Pieces

Building Your Own PC, part 3 – Assembling the Pieces

by Richard White

2011-07-04

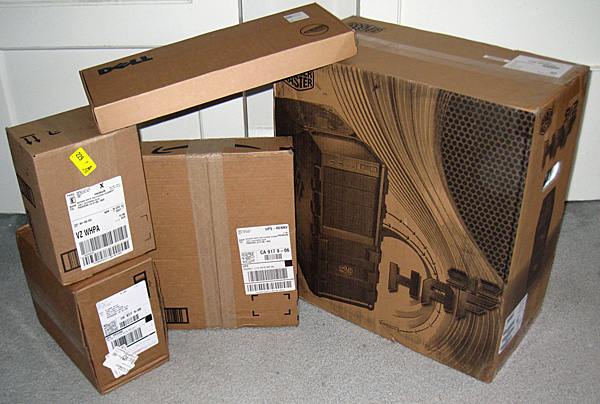
So, you’re building your own computer, and you’ve received shipments from Amazon and newegg.com that contain the components that you’ve so carefully selected. Those boxes are piled up in some corner of the apartment, and you’ve managed to set aside a few hours in your schedule during which you can get to work assembling everything into a working computer.

Be aware that this process may take no more than an hour if you know what you’re doing. In my case it took several days of here-and-there work, and that’s not including the week I had to wait for my replacement CPU to come in.

Yeah. There was a replacement CPU that had to arrive.

As previously mentioned, there was a slight hiccup in my ordering: the motherboard I’d ordered, which is perfectly compatible with the Intel i3 CPU I ordered, isn’t compatible with the Intel i3 CPU I ordered.

Confused? I was, too.

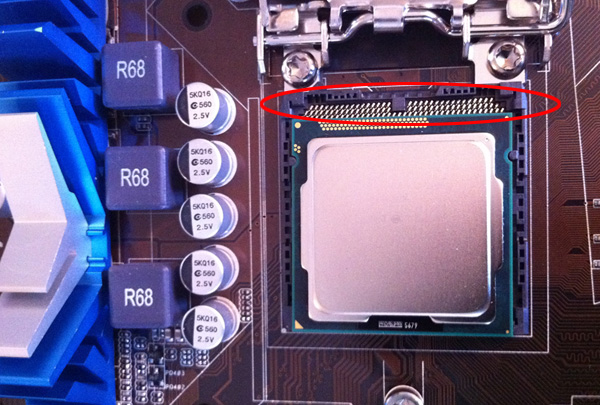
The CPU pins are NOT aligned correctly with the socket on the motherboard. Big problem!

It turns out that there are slightly different builds of the i3, some designated 1155, and some designated 1156. These two versions of the i3 chip have different pin configurations, and are completely incompatible with each other. It turns out I’d ordered an 1156 motherboard, and an 1155 chip.

Someone doing a little more research than I’d done might have figured this out… or maybe not. I’d actually cleared my order with a couple of practiced “build your own PC” guys who do this on a regular basis for fun, and they hadn’t known about it either. So… yeah. When the chip wouldn’t fit on the board the way it was supposed to, I did some more digging around on the Internet and eventually figured out what had gone wrong.

These numbers should have been the same--who knew?!

This, boys and girls, is why you keep the old packaging, at least until your machine is up and running. I printed out a return label from the Amazon website and sent back the CPU, and ordered the correct one to replace it. A week later, I was again ready to start building.

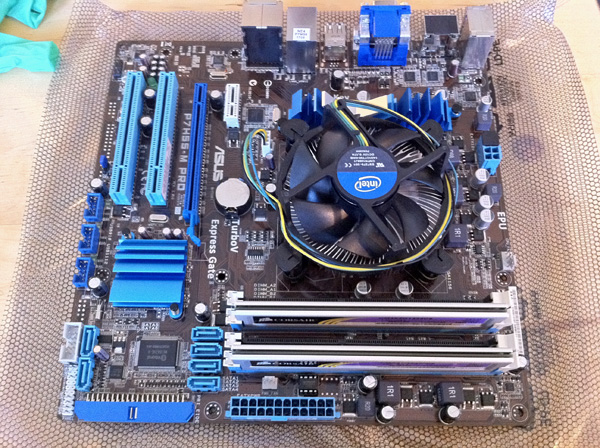
The motherboard with the CPU installed, the heatsink/fan over the CPU, and the RAM inserted into the memory slots.

Follow the instructions on whatever website you’re using to guide you in this process. My workflow went like this:

  1. Unpack case and power supply, and install power supply in case, using instructions included with case.
  2. Unpack motherboard and CPU. The instructions included with your motherboard will be awesome! Use them! Find latex gloves (from an old first aid kit) to wear while handling the CPU, or be really, really careful to only hold it by the edges. Install CPU on motherboard.
  3. Install heatsink over CPU.
  4. Install RAM onto motherboard.
  5. Install motherboard into case.
  6. Install drives (CD-ROM, hard drives, etc) into case.
  7. Attach cables from power supply to motherboard and drives.
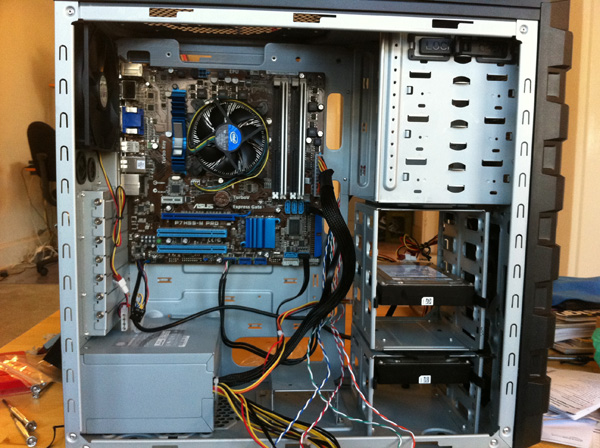
The motherboard in the case, with the power supply in the lower left, and the disk drives in the lower right.

Theoretically, the computer is ready to go at this point, but… something almost certainly went wrong. A cable attached incorrectly, or a switch on the motherboard that’s in the wrong position. Who knows? Don’t close up the case completely just yet…!

  1. Attach monitor, keyboard, mouse, and power cable to the back of the computer.
  2. Power monitor on, then computer
  3. Play with BIOS as required for your system, following the instructions included with your motherboard.
  4. Install operating system of your choice, typically by booting from a CD, DVD, or USB install disk.

In my case, I ended up installing Ubuntu 10.04 LTS on my computer; this took another hour or so to run through the install process. Followed by an additional hour or so installing updates. If you’re installing Windows, make sure that you also install anti-virus software (AVG is probably the best of the free ones, although you’ll have to search around a bit on the site to get the free version, and not the “free trial”).

And over the course of the next few weeks or so, as I used the machine, I ended up installing additional software on there, as well as copies of all the files on my laptop. That was the original intent of this machine for me, after all: to backup my current computer, and archive other files that I want to hang on to.

Something I’d strongly recommend that you do immediately: create a small text-file on your computer that you use to keep track of software installs, modifications to the machine, etc. Every time I install a new piece of software, I write down the date, the software, and the license key if there is one. Having a list of all the software and modifications to your machine will be invaluable in case of trouble, and can be used as a resource when you end up moving to a new machine at some point in the future.

Keeping the Brain Flexible

Keeping the Brain Flexible

by Richard White

2011-07-02

They say that keeping your brain active is an important part of trying to stave off the natural effects of aging on brain function. This may be good advice on a neurological basis, but I think it’s even more important for teachers to stay cognitively active.

This is harder to do than you might think. I’ve spent a good part of my teacher prep time for the last ten years or so trying to devise materials and methods that will allow me to me less cognitively active. “If I put these materials on PowerPoint slides, I’ll be better organized (i.e. put less future thought into creating my lessons).” Or, “if I assemble a great test bank of questions now, I won’t have to work as hard when I need to write a unit test on this material next year.”

There’s nothing wrong with this, of course. I’m just about the biggest fan of “Work Smarter, Not Harder” there is. But being more efficient isn’t necessarily doing my cognition any favors.

Our brains, it turns out, like to be puzzled. Which brings us to vi, now vim.

What’s vi?

That’s not the Roman numeral “6,” that’s actually the two letters “v-i”, pronounced “vee-eye,” and referring to a text editor that was originally written back in 1976 by Bill Joy. vi has since gone on to become the power text editor of choice, beating out by a healthy margin gedit, emacs, and all the others in a recent survey.

Wait… what’s a text editor?

If you don’t know about “text editors” yet, you don’t know what you’re missing. Text editors allow you to write simple, unformatted, text-based documents without, say, having to wait 5 minutes for Microsoft Word to launch. Another advantage includes the fact that “text is text”—you don’t have to worry about whether you have the right version of a proprietary software package to open a file (Microsoft’s 2004 software won’t open its 2008 .docx files, for example.) The disadvantage to text files is that they don’t support even the simplest formatting: bold text, italicized text, underlined text are not available. You get text, and that’s it.

I use text files for lots of different things, from to-do lists to lesson plans, from journal entries to coding programs and websites. So I’m kind of a fan. On the Mac, I started out using BareBones Software’s free TextWrangler for awhile before deciding to pony up the big bucks for their professional-level BBEdit. I played around with emacs for a bit, and recently have enjoyed working in TextMate.

All of these are perfectly awesome text editors, and well worth your time, money, and attention.

You may have noticed that vi is not on that list.

vi, for me, has been super difficult to learn. It’s what people call a “modal” editor, meaning that you have to switch between 2-3 modes while working with your text—inserting text is different from editing text—and that process of switching back and forth between the two modes is difficult for me, cognitively.

Doing the difficult thing

So that’s why I’m learning vi this summer. It’s the most popular text editor for geeks by a large margin, it’s amazingly powerful, AND I get to try to learn something new that my brain has to struggle with?

Sign me up!

That’s what I’m trying to do this summer that’s difficult for me. What are you doing to keep your brain plastic? Something creative? Something challenging? Something you don’t already know how to do?

NOTE: If you’d like to try vi for yourself, it comes pre-installed on Apple OS X and any Linux distro—launch a Terminal and type vi to try it out. Fair warning, though: you’ll want to Google “vi tutorial” or something similar for advice on getting started.

Windows will have to install vim by following the instructions here.

Good luck!

Building Your Own PC, part 2 – Design and Ordering

Building Your Own PC, part 2
Design and Ordering

by Richard White

2011-07-01

There are two reasons you might have for wanting to build your own PC:

  • You have a need for a new computer, or
  • It’s just so frickin’ cool, building a computer.

Ideally, both of these reasons would apply.

In my case, I needed a new machine to replace an old PC that had finally completely failed; the hard drive in the old hand-me-down PC wouldn’t even boot anymore, so I figured it was time to create my own “dream machine.”

If you’ve read the Ars System Guide—highly recommended before embarking on this journey, and to be consulted along the way—you know that their Dream Machine refers to high-end powerhouse computer complete with solid-state disk RAM and a screaming fast graphics card, usually for running processor intensive games under Windows.

My dream machine, however, is a little more utilitarian. For my purposes, I simply needed a machine that I would use for backups of my other machines, and to store and potentially serve media at my house. I don’t need fast booting on this machine, nor even a dedicated graphics card—in my research, I selected a motherboard that had onboard graphics that would be just fine for my purposes.

The money I saved in using a lower-end processor was instead spent on hard drives that would be used for my backups and media. Because these are backups, and even backups need a backup, I eventually ended up with 4 one-terabyte drives: one for the system and media, one for the backups, and the other two mirrors of these first two. (For the more technically inclined, I did not configure these drives as a RAID. I’m simply rsyncing the drives on a periodic basis.)

So that’s my machine. You’ll obviously need to figure out what kind of machine you’re looking to build.

Once you’ve got that sort of figured out, then you can start really looking through the guides to see what kinds of recommendations they might have for you. And for a first-timer, it really does make a whole lot of sense to get some advice from the experts. There are so many different technical considerations that govern whether or not the different components will work together, your chances of designing your own computer—case, power supply, motherboard, processor, memory, hard drives, and graphics card—successfully but without guidance are virtually nil.

Even following someone else’s guidelines, you’re going to face some challenges.

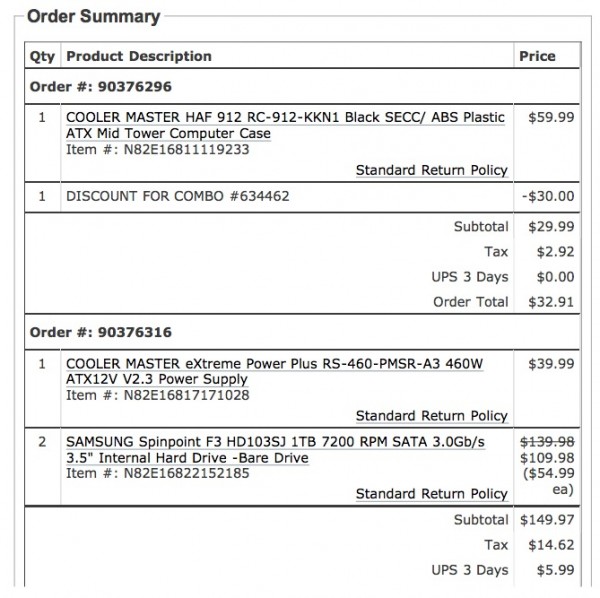
Ordering the various components of your machine consists, then, of poking around on sites that sell these things. Just about everyone I spoke with in the course of building my own machine orders from newegg.com and Amazon.com, who both have a good selection, multiple shipping options, and user reviews that provide yet another data point in your decision on whether to order this hard drive or that hard drive. I ended up ordering my hard drives from newegg.com rather than Amazon for example, because several people complained on the Amazon site about how the drives had been shipped to them. I got my case and power supply and newegg.com as well, because there was a discount for buying them together there.

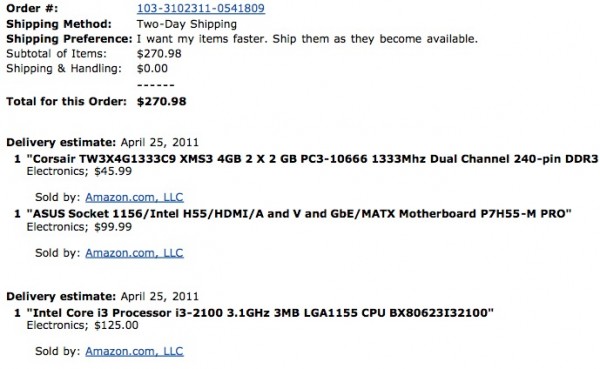
It took me an evening to finally get my newegg.com order put together, and the next day I finished up with my Amazon.com order. Here’s what I ended up order from each one.

In preparation for next time… can you see the mistake in one of my orders below? Can you determine which part I ended up having to send back??!

Summary of order from newegg.com

Order from Amazon.com

Building Your Own PC, part 1 – Introduction

Building Your Own PC, part 1
Introduction

by Richard White

2011-06-30

After many years of hearing about how much fun it was, I finally jumped into the pool this April and built my own desktop PC. It was, in a word, AWESOME, and I heartily recommend that you do the same.

I have a rep as being something of an Apple fan, never mind the fact that I’ve also got Dell and Lenovo laptops dual booting Windows and Ubuntu. The unfortunate truth, however, is that Apple is so picky about making sure their hardware is built to specification, they don’t allow anyone to do it but themselves. I’m not complaining–the results of this policy speak for themselves. But if you’re going to build your own desktop, it’s going to be a PC running Windows or Linux.

And before we get too far into it, let’s be clear: we’re not talking about soldering integrated circuits or transistors onto a circuit board, and testing your electrical engineering skills with an test oscilloscope, or anything ridiculous like that. What we’re talking about is you taking some time to:

  1. Decide what you want to use your new computer for
  2. Settle on components that you’ll be using to assemble your new coputer (even if you’re not really sure what those components might be at the beginning)
  3. Poking around on the Internet looking for advice and good combinations of components that will make the machine you want
  4. Ordering those components online (most likely from newegg.com and amazon.com)
  5. Patiently waiting for those components to arrive
  6. Finding a few hours when you can settle in and try to assemble everything
  7. See that you’ve made a mistake in one or two items that you ordered, and send the ones you received back in to be replaced with what you really wanted
  8. Get new components, and assemble them into your dream machine
  9. Boot into the BIOS, and fix things that may not be working
  10. Install the operating system of your choice, as well as updates and drivers as necessary
  11. Install additional software as desired
  12. Admire your awesome machine!

As you can tell from some of the steps on the list up there, things don’t always work the way you’d thought they would the first time. While this is almost certainly going to be a source of frustration when it happens, you should also look at it as an opportunity to come to a better understanding of the hardware, and a chance to appreciate just how much work goes into getting these things to work the way they’re supposed to.

I’ll tell you how I began the process of building my own machine next post. In the meantime, you have three homework assignments.

First, start thinking about what kind of machine you’d like to build. Is it going to run Windows, Linux, or both? Is it going to be a lightning fast gaming machine, or medium-fast machine that you’ll use for surfing the internet and reading email, or a slower machine that you’ll use for backups, or serving media to other computers at your house? The uses you envision for your machine will determine the design and components you select.

Second, see if you can’t scrounge up a spare mouse, keyboard, and LCD monitor that you can use. You can use borrowed gear for these items at first, at least until you get your machine up and running. If you want to get fancier custom keyboard, mouse, or monitor, you can certainly buy them when you get the components for your computer, but they’re not strictly necessary. (In my case, I pulled an old keyboard and mouse out of the dumpster, and asked the tech people at my school if they were throwing away the old 15″ LCD monitors I saw sitting out in the rain.)

Third, do a little background reading on the Internet to help you figure out what you might want to include in the design of your new machine. Each article / website here comes highly recommended:

Next time? “What’s in all those boxes??!”

Our Ongoing Work

Our Ongoing Work
Part of our job is to be patient.

2011-02-06

by Richard White

A transcript from an exchange in my office last week, when a colleague came in for some technical assistance:

“Rich, can you help me with something? I have a list of email addresses and I want to send an email to all of them.”

My colleague sits down and plops his laptop in front of me.

“Sure. Where’s the list?”

“It’s here. I’ve selected all the emails, and I’ve copied them.” He shows me the highlighted names.

“Okay,” I say, “let’s paste them into your email address field.” I press two keys and the addresses are pasted.

“Whoa, whoa, whoa…! What happened there? How did you do that?”

“I pasted them in there. That’s what you wanted right?”

“Yeah, but how did you do it so fast? What did you press on the keyboard?”

“I pressed control-v.”

“Control-v, huh? Cool. I’m going to gave to remember that.”